Here are the different steps to make a paper delta glider airplane origami: 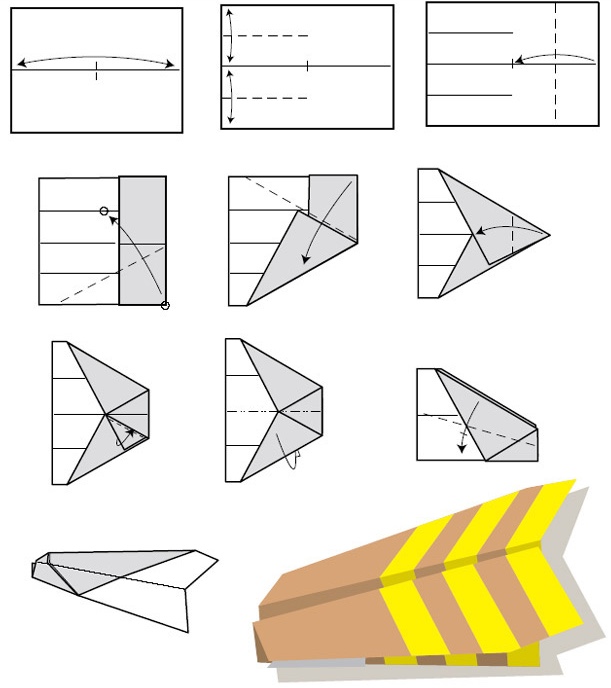
- Place the sheet in landscape orientation. Fold it in half horizontally (top edge to bottom edge) to mark the center crease, then unfold.
- Draw (or imagine) three horizontal bands: first fold the top edge towards the center, then the bottom edge towards the center, to mark the guides.
- Then fold the sheet vertically in half (left edge to right edge), then unfold. This line marks the axis of the nose of the airplane.
- Fold the left edge towards the midline, bringing the top left corner to the indicated mark to form a diagonal: the top edge aligns with the midline. Repeat the same for the bottom left corner (the two folds cross diagonally).
- Now fold the top right corner towards the center along the same diagonal, symmetrically. The two top edges form a large triangle pointing to the right (the future nose).
- Fold the top corners of this triangle towards the center again to refine the tip: the nose becomes narrower and triangular.
- Fold the model in half along the vertical center line, nose to the right (the triangle towards the outside).
- To form the first wing, fold the top layer diagonally downwards along the indicated line, from the nose towards the back. Mark the fold well.
- Turn the model over and repeat the same fold symmetrically to form the second wing.
- Unfold and adjust the wings so that they are flat and symmetrical. The "Delta" airplane is finished, with a wide wingspan and a pointed nose.